Feeds:
Posts
Comments

Archive for February, 2008

After a prolonged operation of moving other aircraft out of the way, were managed to pull the Warrior out of the hangar to test run the re-assembled engine. I received yet another harsh reminder of the true cost of taking night classes in the winter: it’s COLD out there.

We had pre-oiled the engine before pulling the plane out of the hangar to ensure that all of the engine bits had at least some access to lubrication when we first started the engine, so it should have been a simple matter to just crank it up and run it. Snapita, of course. What appeared initially to be a dead-ish battery (and in this case, given the hugely deflating, anti-climatic failure to turn over, I prefer the word “flaccid”) turned out to be a problem in the wiring. An hour of fiddling around with that, wishing all the while that, if not Rome, at least something was burning to provide some heat, the wiring was jury-rigged enough to allow another attempt.

It started right up. No apparent leaks, and all of the parts (at least those visible to the naked eye) remained attached. Success!

Well, partial success. The engine steadfastly refuses to rev up any higher than 1,300 RPM. At that point, it just quits. Fuel starvation, it appears, which indicates a problem in the carburetor. Now, here’s something we didn’t know: when the initial damage to the pistons and cylinder heads occured, they were running the engine to try to determine the cause of (wait for it…) fuel starvation at higher RPMs. Late to be learning that, in my opinion, but nothing to be done. We did all we could do, and now it will be up to the advanced engine class to find the fault with the carb. Which, of course, they will do inside, where it’s warm.

Read Full Post »

Fillets and Glass

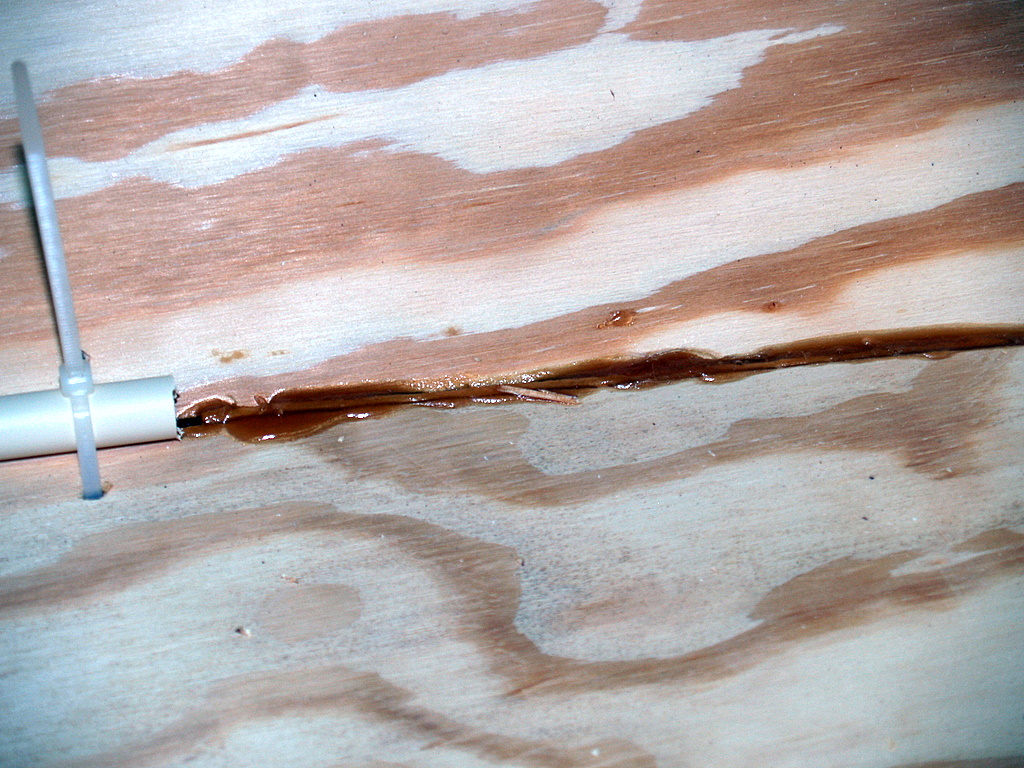
Earlier this week, I “tack welded” the edges between the bottom and the lower chine pieces. The idea is to get enough epoxy in place to hold the parts together without the aid of the plastic tie wraps. Because of the large clearances between the parts, the epoxy has to be thickened with sawdust (or to use the term on the side of the bag, “wood flour”) to keep it from just seeping through the gaps and adding to the already copious amounts currently adhered to my basement floor. It has to be thin enough to get down in the tighter gaps (what few there are), though, so it would still drip through and cause difficult to remove stalactites on the outside of the boat. To avoid that, I ran masking tape along the outside seams where ever I could see light coming through.

The epoxy/wood flour slurry also has to be thin enough to be loaded into the applicator, which in this case is a plastic hypodermic syringe:

I mixed the slurry in a plastic drink cup, and sucked it up into the applicator by sticking the open end into the mix and drawing it in by pulling out on the plunger. I then filled the gaps between the parts by injecting the epoxy mix into them:

Where the gaps were really, really wide, I trimmed some thin shims of plywood from some of the scrap left over from cutting out the larger pieces and stuffed them into the gaps before injecting the slurry:

I let the epoxy set up for a few days, mostly since the latter half of the week was pretty hectic and I never really had the time and/or energy to start on the next part. Today’s weather being what it is (read: crappy), I moved on to filleting the seams and covering them with fiberglass cloth tape. The tape doesn’t handle sharp angles well, and the fillets aid in that by providing a larger radius for the tape to work with. I suspect that the fillets also provide a bit more strength to the joints, but their primary purpose is to provide a good seat for the joining tape.

The epoxy gets mixed with wood flour again, but this time to a consistency almost like that of modeling clay. It is going to be pushed down into the seam and molded into the required shape, so there is no reason to it to be very thin. That consistency precludes the use of the syringe for getting it into the boat, though, so I used a different technique. With the filleting, I use a plastic kitchen storage bag with a tip cut into one of the corners, much the same way a bag would be used to apply decorative icing to a cake.

The first step is one of those that requires a pretty healthy dose of faith: cutting the tie wraps out. The faith comes in believing that the tack welds will hold and the whole boat won’t explode apart:

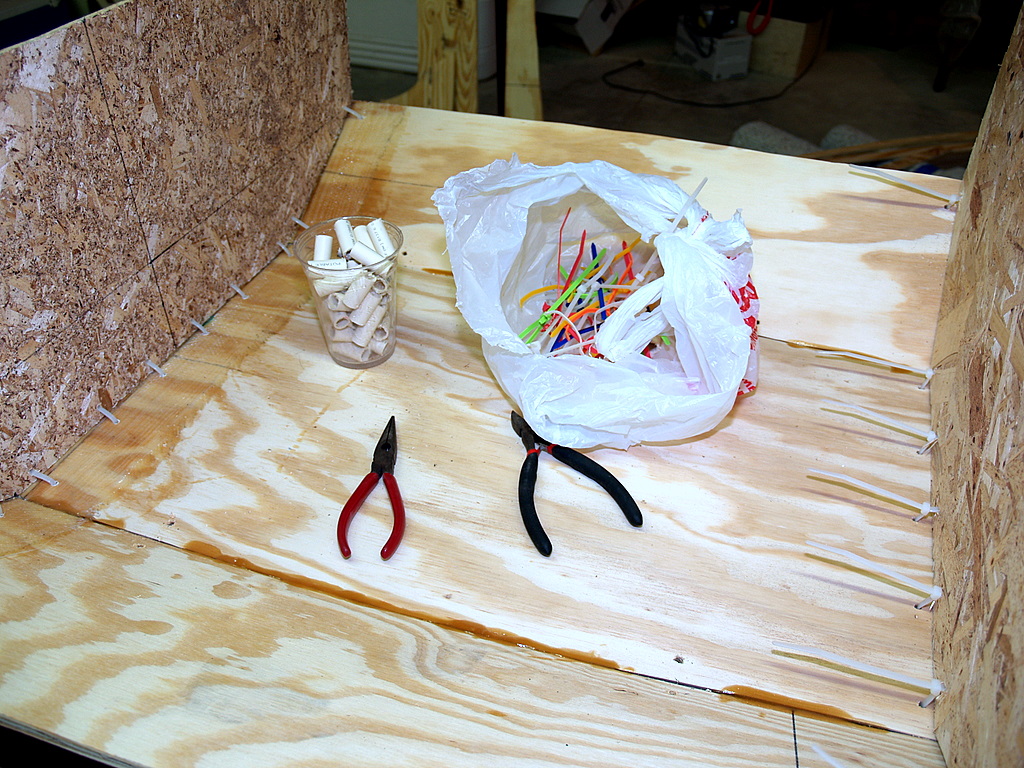
It held together, so I went ahead and cut the pieces of fiberglass tape to length:

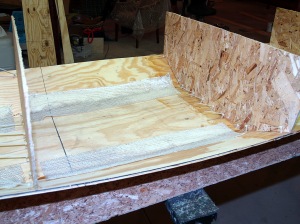
This is one of the costs of using the OSB molds to hold the parts together. If I was just using spreaders, I would be able to do each side all at once. With the molds in the way, I have to work in the bays, and when the molds come out, I will have to go back and fill in the gaps. It’s a small trade-off, in my opinion, given the huge benefit the molds provide in the initial shaping of the boat.

With the epoxy mixed and squeezed down to the corner of the bag, someone needs to help by cutting the corner. I have an itinerant laborer that comes down to the Boat Works now and then to lend a hand:

It’s easy to then simply run a line of the thickened epoxy down along the seam:

When I did this with the kayak, I then used the end of a plastic spoon to impress the fillet shape into the epoxy. This time I just laid the glass into it and pressed it down into shape with a gloved finger:

I then mixed up a batch of unthinned epoxy to wet out the tape. This remains a job that I’d prefer to be able to hand off to Mike Rowe. The loosely woven fiberglass tape sheds threads easily, and they get strung along with the plastic spreader that I used to move the epoxy around. If I leave them there, I have to try to sand or scrape them away later. This being a canoe, there’s not even the opportunity to hide away the majority of my sloppy work like there was when doing the interior of the kayak. I got it done, but between the glass and the wood being very thirsty, I’m already starting to wonder if I will have enough of the relatively expensive epoxy to finish the job:

Mid-way through the wetting out, my laborer complained about the atrocious smell and left the Boat Works. I haven’t yet decided if it was the smell of the epoxy or that of the Chief Boat Builder, who had at the time not yet showered, that she was complaining about, and she won’t say. Smart girl, that one!

Read Full Post »

Pea soup, chilled

Pea soup, as in “fog thicker than.” You don’t have to be a regular reader here to know what a Weather-Out-The-Window(tm) forecast like this means. It’s so foggy that even Brave Sir Hogarth can’t find an excuse to wake the neighbors with his booming bark:

A second opinion from the front window confirmed it:

It’s a Boat Works day. Check back later for a progress update.

Read Full Post »

It’s been a pretty back week for weather. I think 50% of my work commutes were through some kind of ice, sleet, freezing rain, snow, or similar. We currently have that weird stuff that we get here in Central Ohio, which is snow with a hard crust of ice on top. The Arizona Chamber of Commerce simply has to be behind this in some way. If it’s not them, it must be Florida.

I have an update on the engine tear-down and reassembly from A&P school, though. You may remember that the engine we tore down wasn’t one of the many “stable horses” normally used for the purpose; this one was pulled off of one of the hangar planes because it exhibited very serious internal damage after one of the ground handling classes ran it. Specifically, it destroyed 6 out of 8 spark plus (there are two per cylinder on an airplane engine) and got a very bad case of combustion chamber acne on 3 of the 4 cylinders. It was obvious that something had been ingested into the cylinders to cause that damage, but it was not obvious what it was. We found nothing in the cylinders when we tore down the engine that would provide any kind of clue.

Everyone pretty much shrugged and decided to just reassemble the engine and hang it back on the airplane. Chalk it up as a mystery and press on, as it were. Well, there we were, hanging pretty much the very last piece of kit back on the engine when one of the guys noticed something. We were in the process of hanging the heat cuff (shroud) back around the exhaust pipes (which is just a piece of metal that surrounds the exhaust pipe and directs some of the heat into the cabin for the comfort of the folks when it’s chilly outside) when he noticed that the piece of screen that covers the carb heat inlet was torn.

Carb heat, for you non-pilots, is simply warm air that is added to the incoming air for the carburetor to keep ice from forming. You can read more about it on Wiki, should you choose to. If not, this is the most important thing to note:

Usually, the air filter is bypassed when carb heat is used.

Because of that, they placed a screen over the hole in the shroud to catch any big pieces of junk before they could get into the engine. That’s all well and good, right up until the screen itself decides to contribute pieces of itself to the fuel/air combustible mix:

While it is by no means a certainty that this is what caused the damage, it is a fact that we weren’t about to put this back on the airplane! That piece of screen has attached to the shroud with a almost-circular “donut” of sheet metal, held in place with five rivets. The teacher was wondering what it was going to cost to buy a new shroud since there was no sheet metal class this quarter when I chimed in that I had already had said class, and would be thrilled to do the repair myself.

So, I stopped by the hangar on Wednesday to pack up my riveting stuff (it was good to see my Gucci rivet gun (so named fir its astonishing color) again – it’s been too long) and other supplies.

I had a little trouble drilling out 2 of the rivets and ended up making the holes a little bigger, but that was ok since the original rivets were #3 (3/32″ diameter) and could easily be replaced with #4 (4/32″ diameter) size rivets. The teacher had some metal screen on hand (which I’m pretty sure came from the Aviation Parts aisle at the local Lowe’s store) that I used to replace the old, torn screen. That should be good enough since, as I have pretty much the entire class saying now, I can guarantee 100% that it won’t fail in flight. (You know, because there is absolutely no way in the world that any of the hangar queens will ever fly again).

That was a pretty fun job, and as we’re hoping to actually start and run the engine on Monday, I should know pretty soon whether it worked or not.

Read Full Post »

Well, I ain’t flying…

… but that’s hardly a good reason to deprive you of a ripping good flying yarn or two.

By way of intro, Lex is a retired F-18 jockey, and as such has never gotten used to the idea of paying for his own flying. Can’t blame him for that, mind you, and sure do appreciate his years at the tip of the spear, but darned if he didn’t find away to leverage that experience into the getting the front seat (paid!) of one of my favorite planes, the Varga Kachina:

The tandem seating, control sticks, and that T-6 looking canopy were oh so intriguing to a teenager dreaming about flying. I finally got to fly one a few years ago, back when I still had the Tampico. The retired doctor that hangars his Kachina across from me (in the hangar right next door to his Bonanza – I really should have considered a career in medicine!) offered to let me fly front seat over to MadCo for gas, while he tended to my ham handedness from the aft position.

Positively giddy, was I, but in retrospect I think it was wise to hold out for an RV rather than try to find a Kachina of my own. Although a -4 or a -8 would better slake my Mittyesque thirst for a more fighter-like seating arrangement than my side-by-side -6, the -6 comes close enough that to ask more is simply to show sinful greed. The point is, the RV planes are closer in flying qualities to a true fighting plane than a Kachina could ever hope to be, so I’m happy that I took on the additional challenge of the Experimental class bird.

Now, to get back to the story, Lex went and got himself a gig flying around in a Varga Kachina with some of those very same dreamers as I was before I grew my wings, dogfighting with another Kachina. I think it may be this very facility (http://www.barnstorming.com/documents/52.html) at which he has gained such desirable employ. Cool work, if you can get it.

In any event, he has taken to sharing stories about his flights in the Kachina, and has posted one today that I thought might fill the gap left by my own failure to provide the entertainment y’all stop by here for. Just to whet the appetite, I’ll tell you how it ends:

We – or I should say I, since himself seemed blithely unaware – had a bit of a startlement on landing since the nose wheel shimmy dampener gave up the ghost at the first hint of wheel brake application. The crate was shuddering and bucking to an alarming degree, and while I suspected a dampener failure, but not knowing the exact failure mode it occurred to me with all the objectionable activity going on up front that maybe the engine was coming apart, but it’s not like we could forgo the option of slowing down. Runways go on for but a finite length.

All’s well that ends well however, and we taxied to the line to the evident relief of his dear ma who had no real need to be any the wiser on the topic of shimmy dampeners. A few photos and a handshake later and our work there was done. “That was a blast! Flying is so cool,” said the young man to me, and I had to agree with him:

“Yes. Yes it is.”

You can read the full story here.

He meets quite a variety of folks, each drawn to the experience for different reasons. Not all are there to get their first taste of real flight (flying in airliners not really being the same thing, at all); many arrive to look the other direction, back into their past:

Climbing out, he came under immediate machine gun fire from the farm house, and dropped to the deck. His wingmen circled overhead, and he thought that perhaps he could ease up, put the plane between him and the threat and run for it, but the instant he raised up even slightly the machine gun tore gouts through the snow around him. The message was clear: We have you. Sit still.

Eventually his wingmen ran out of gas, and returned to their base. Once the fighters had gone, out came the Wehrmacht soldiers. Hands up. Come with us. Your war is over.

You really ought to read all of that one too. Here.

Have you noticed how sometimes the details of the flying take a back seat (so to speak) to the emotions and satisfaction that comes from the sharing of it? I suppose that’s why I find these little stories so fascinating – it’s probably the one thing in my aviation experience that I can fully share with an F-18 pilot.

That’s kind of cool.

Read Full Post »

Can I just say?

I saw a little ESPN yesterday afternoon, I just want to say that I think it’s sad and deplorable that such vile, despicable, self-aggrandizing low-lifes have latched onto professional baseball.

Brian McNamee? Oh, well, I suppose so.

But Henry Waxman??

Read Full Post »

Yes, I know you’re all endlessly fascinated with the local weather situation here in Columbus, and even more so in the specifics of my daily commute, so here’s today’s Google Traffic map, circa 10am:

I have never seen so much yellow and red this late in the morning! Makes me glad I got up at 0500 and beat the rush! And at least I didn’t have to drive the Miata again – that would really have been a treat.

Read Full Post »

So, after my wonderful 35 mile commute of this morning, I left the office and walked towards the Miata, with “these things always come in threes, these things always come in threes” running through my head.

I’m not making this up: the car started fine, but wouldn’t go into gear. With the clutch pedal pressed as hard to the floor as I could get it, I tried to force it into gear but it started rolling before the gears engaged. “Ah,” I thought, “it needs more cowbell clutch.” I shut it down and went back up to the office, where I quickly and efficiently utilized my knowledge of how to extract exactly what I need from Google in order to learn how to tighten the clutch. As long as I was there, I also purloined an adjustable wrench from the office toolbox.

For the curious, tightening the clutch is as simple as loosening the jam nut on the clutch pushrod and running the rod out a few threads. That’s a snapita, of course, because it’s pretty tight quarters down by the pedals in a car as small as a Miata, and even more so when bundled up against the biting cold in a bulky leather bomber jacket.

Still, I was able to get the clutch engaged enough to get me home, so that’s something.

Read Full Post »

Ubid morning

ubid [oo’bid]

–noun
1. Similar to snapita, except that it means “Unexpected blessing in disguise.”

Usage: The Miata snapita turned out to be an ubid.

[Origin: February 11, 2008. David R. Gamble]

0530, 5 degrees Fahrenheit this morning. The Suburu wouldn’t start. Had I not charged up the dead battery on the Miata Saturday, I would have been stuck.

Of course, I used the Subie to jump start the Miata, so there may be a cause/effect relationship at work there. I prefer not to think too much about that, though. Kind of an “every cloud has a gray lining” path there, should I choose to follow it.

Oh, and a 35 mile Miata ride at 5F? Not so very pleasant, truth be told.

Read Full Post »

This blows

Today’s weather, that is. Mama mia, it’s 26 gusting 38! I’m not sure I could even safely taxi out to the runway in that! The temperature is just shy of balmy 20F, and with the wind chill it feels like being stabbed with icicles if you spend even the briefest time outside. At some point, it’s going to be hard to not take this kind of weather personally. What did I do, Al, what did I do? Bring back my global warming!

Like an old trail horse heading back to the stable at the end of a ride, once I determined that the weather was in no way flyable I pretty much found myself automatically heading down to the Boat Works. I found a bag of tie straps in the hangar this morning, so I didn’t have to brave the crowds at Harbor Freight to replenish my supply. They’re a bit garish, as you’ll see, but no less functional for that.

It was, as expected, quite difficult to get the bottom chines to come together at the bow. Between two ratcheting tie down straps, plastic tie straps every few inches, and copious amounts of swearing as I’d get to the end and find out that things just hadn’t lined up correctly and it had to be taken apart again for a do-over, I finally achieved this:

Unfortunately, some of the gaps between the bottom and the lower chines are still pretty wide:

Between the gaps and all of the holes that I’ve drilled for the tie straps, it seems that I’m going to be relying pretty heavily on epoxy and filler to keep the water on the outside of the boat. I think I may have to placard the boat against operation in anything deeper than 3 ft. of water for liability reasons.

It’s definitely starting to take on the look of a boat, though:

Here you can see the cost of the twist that I accidentally built into the bottom pieces:

In retrospect, it would have been better to use the bent PVC pipe to draw the curve on one side, then measure a bunch of points on the curve and transcribe them to the other side, rather than putting quite so much faith in the pipe to bend equally on both sides using points 24″ apart.

I can either cover that up and shape it nicer with epoxy, or sand/rasp/cut it down flush. Or, more likely, a combination of the two. The other end will probably look just as bad. I won’t know about that today, though, since I intend to spend a few days recovering before going through the same chore again.

Read Full Post »

Older Posts »